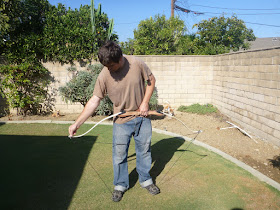
For Ben's 30th birthday he received a bow and set of arrows. We first went to the roving archery range at the Pasadena Rose Bowl and on Ben's very first shot he hit a bull's-eye! We had a great afternoon shooting with his dad, but alas Pasadena is a bit too far to go shoot arrows on a daily basis. Ben remedied this by purchasing some hay bales and setting them up on the side yard, now he enjoys shooting every morning before work.
And now I will pass the blog entry off to Ben to teach you all some of his techniques:
I like to prepare my paper targets to last as long as possible on the hay bales. My trick is to put a square of duct tape on the backside of each corner, then use an office hole puncher to put a neat round hole in each square.
From the front it still looks clean, but it has reinforcements. The extra strength is not so much for being shot, but for arrow removal, when it is more likely to get caught and tear at your nice target face.
The target is held to the bales by means of dollar store wire barbecue skewers (the ones with the ring on one end). These hold the face to the hay nicely, and are easily removable for when you need to change targets, or when you pack up and head out to the public range.
My archery butt is made of a stack of hay bales I procured from a local dairy farm. Having had some bad experiences with exposed hay targets, I decided to innovate and prevent some of the common problems I've seen at nearly every summer camp range. Most importantyl, I got the hay off the ground. I used a pallet and a pair of bricks.
This both elevates and levels the stack. Elevating the hay is important, since a lot of the deterioration you see on archery targets comes from below. This keeps weeds from growing up into it, and allows for drainage out of and under the target. I cover the range with a tarp when not in use to keep out as much moisture as possible. Once it gets wet, it starts to rot pretty quickly in my experience. Elevating and covering my hay has kept my target bales in good condition for almost 6 months.
Laminated wood bows need to be strung via a stringer. While with many of the synthetic fibre bows you can simply use the step-through metod of bow stringing, this can permanently damage a wooden limb.
Stringers are actually a lot easier to use than the step in method, in my opinion. You start with the bowstring on the unbent bow. The larger loop goes loosely around the upper limb, and rests about halfway down, while the lower, smaller loop goes onto the lower nock.
The stringer has two small caps. Put the larger one over the bottom nock with string on it. This will hold it in place while your bend thebow. The small cap goes on the top nock, allowing that string to slide into place.
Once the stringer is in place on both nocks, step on the stringer, and hold the bow with one hand.
Lift up on the bow, bending it on the stringer until the bowstring has enough slack to slide into place on the upper nock. Carefully check to make sure it is seated properly in its groove, then let the pressure off the stringer, and remove it.
The bow is now ready to shoot! Here's how I get my stance:
To get my stance correct, I like to stand with my bow hand outstretched and aim down it toward the target, and align my body.
With fingers on the string, I start to draw, still pointing at the target, until my string hand is all the way back to my chin. You can also see the extent of my safety gear in this picture. I like to use an arm guard and three-fingered shooting glove. Though proper rotation of the bow arm prevents most string strikes, I still like to use the guard in case something goes wrong. IT is also quite nice on a cold day, since it keeps your sleeve out of the way.
With anything heavier than a kiddie bow, I strongly prefer to use a shooting glove or finger tab. Otherwise your hand gets worn out really fast and you can't shoot for very long. My favorite is the glove. It covers the tips of 3 fingers, and stays on the hand easily.
A note on target positioning. Depending on what is behind your archery butt, you want to carefully consider where you place your target on the bales.
If the center of your target goes over a gap where two bales meet, it is quite likely that arrows will go clean through your target and into the wall/ car/ cat/ something else you don't want to hit behind it.
Even with good placement, it still happens.
When an arrow goes in too deep, it is best to pull it all the way through, I find. This pulls out less hay from your target, minimizes ripping on the face, and, most importantly, is kinder to the fletching (feathers) on your arrows.
You can see the difference between hitting the hay and going between bales here...
All in all, archery is quite fun, and I'm lucky to have such a fun wife who lets me practice in the back yard.
...and here's my bow. It's a recurve bow with removable limbs meant for target shooting.The arrows are aluminum shaft with feather fletching. Aren't they beautiful?
Cheers,
Benjamin


For Ben's 30th birthday he received a bow and set of arrows. ... bowtarget.blogspot.com
ReplyDelete